> For the complete documentation index, see [llms.txt](https://docs.developer.disruptive-technologies.com/llms.txt). Markdown versions of documentation pages are available by appending `.md` to page URLs; this page is available as [Markdown](https://docs.developer.disruptive-technologies.com/data-connectors/creating-an-aws-sqs-data-connector.md).
# Creating an AWS SQS Data Connector
This guide describes how to set up an AWS SQS Data Connector, which forwards sensor events from DT Cloud directly into an Amazon SQS queue in your AWS account.
*Last verified against the AWS and DT Studio consoles in July 2026. Menu names and screenshots reflect the console as of that date. The underlying setup does not change often, so the steps remain valid even if a button has moved.*
### Overview
An AWS SQS Data Connector forwards live [sensor events](https://docs.developer.disruptive-technologies.com/concepts/events) from DT Cloud into an Amazon SQS queue that you own. From there you can process, store, or analyse the data using your own AWS services.
The connection uses OpenID Connect (OIDC) workload identity federation. DT Cloud does not hold a static AWS access key. Instead, it presents a short-lived token that AWS validates before it issues temporary credentials. This means there is no long-lived secret for you to store or rotate.
The setup can be summarized in a few steps.
1. DT Cloud presents an OIDC token that contains your DT Studio Organization ID as the subject, and an audience that you choose.
2. AWS validates the token against an identity provider and an IAM role. You configure the role to trust only tokens that carry your Organization ID and your audience.
3. The role grants permission to call `sqs:SendMessage` on your queue, and the event is delivered.
```mermaid
flowchart LR
A[DT Cloud] -->|"OIDC token"| B[AWS STS eu-west-1]
B -->|"Validates"| C[Assumed IAM role]
C -->|"Sends event"| D[(Your SQS queue)]
```
The remainder of this guide configures the three components involved: an identity provider, an IAM role, and the SQS queue.
### Prerequisites
**DT Studio User Account**
Creating, updating, and deleting Data Connectors requires that your user or service account has been granted the role **Project Developer** or higher.
**DT Studio Organization ID**
Note down the Organization ID of the Studio organization where you want to set up the Data Connector. You can find it by clicking your organization's name in the lower-left corner of DT Studio.
**Amazon Web Services account**
An AWS account with sufficient permissions to create IAM identity providers, roles, and policies.
**STS enabled in `eu-west-1`**
DT Cloud calls AWS STS in the `eu-west-1` region. STS is enabled by default for most accounts, but it can be disabled manually. See [Activating STS in a Region](https://docs.aws.amazon.com/IAM/latest/UserGuide/id_credentials_temp_enable-regions.html) for information on how to check and enable it.
**SQS Queue**
An SQS queue to send events to. The Data Connector has no specific requirements on the queue configuration, so a standard or FIFO queue with default settings will work. For guidance on creating a queue, see AWS's guide, [Send Messages Between Distributed Applications with Amazon SQS](https://aws.amazon.com/getting-started/hands-on/send-messages-distributed-applications/). If you choose to encrypt the queue at rest with a customer-managed key, see Encryption at Rest with KMS for the one additional permission required.
#### Values You Will Collect
You create the following values during setup, then enter all four into DT Studio at the end. We recommend keeping them together as you go.
| Value | Where it comes from |
| ------------------------- | ------------------------------------------------------------------------ |
| DT Studio Organization ID | DT Studio, by clicking your organization's name in the lower-left corner |
| Audience | You choose it, for example `data-connector` |
| Queue URL | The SQS console, on your queue |
| Role ARN | Created during setup, in the IAM Roles section |
| KMS key ARN (optional) | Only if you encrypt the queue at rest with a customer-managed key |
The audience is set in two places, the identity provider and DT Studio, and the two must be identical. If they do not match, events will not be delivered. If you are uncertain what to use, `data-connector` is a suitable default. Additional audiences can be added later if your use case requires them.
### Choosing a Setup Path
There are two ways to configure the AWS side, and both produce the same result.
The **CloudFormation** path provisions the queue, identity provider, role, and policy from a single template, and outputs the values you need for DT Studio. We recommend this path when you are comfortable deploying a stack, as it is faster and reproducible.
The **manual** path configures each component by hand in the IAM console. It is useful when you want to see exactly what is created, or when you are connecting to a queue that already exists.
Both paths finish in DT Studio.
### Setup Using CloudFormation
The following template provisions everything needed for a Data Connector: the queue, the OIDC identity provider, the role, and the send-only policy. You can extend it to fit your own conventions, or use it as a starting point for your own template.
{% code title="dt-sqs-data-connector.yaml" lineNumbers="true" fullWidth="true" %}
```yaml
AWSTemplateFormatVersion: 2010-09-09
Parameters:
OrgID:
Type: String
Description: ID of the DT Studio organization the Data Connector is located in.
Audience:
Type: String
Description: Audience included in the request to AWS STS. This must match the audience configured in DT Studio.
Default: data-connector
QueueName:
Type: String
Description: Desired name of the Data Connector queue.
MessageRetentionPeriod:
Type: Number
Description: The amount of time, in seconds, that SQS retains a message that is not deleted.
Default: 1209600
VisibilityTimeout:
Type: Number
Description: The length of time, in seconds, that a message received by one consumer is hidden from others.
Default: 30
ReceiveMessageWaitTimeSeconds:
Type: Number
Description: The maximum time, in seconds, that polling waits for a message to become available. Minimum 0, maximum 20.
Default: 20
Resources:
DataConnectorIdentityProvider:
Type: AWS::IAM::OIDCProvider
Properties:
Url: https://identity.disruptive-technologies.com/data-connector
ClientIdList:
- !Ref Audience
DataConnectorQueue:
Type: AWS::SQS::Queue
Properties:
QueueName: !Ref QueueName
MessageRetentionPeriod: !Ref MessageRetentionPeriod
VisibilityTimeout: !Ref VisibilityTimeout
ReceiveMessageWaitTimeSeconds: !Ref ReceiveMessageWaitTimeSeconds
DataConnectorRole:
Type: AWS::IAM::Role
Properties:
RoleName: data-connector-role
Description: Role assumed by Disruptive Technologies to push events directly to AWS SQS.
AssumeRolePolicyDocument:
Version: 2012-10-17
Statement:
- Effect: Allow
Principal:
Federated:
- !Ref DataConnectorIdentityProvider
Action: sts:AssumeRoleWithWebIdentity
Condition:
StringEquals:
identity.disruptive-technologies.com/data-connector:sub: !Ref OrgID
identity.disruptive-technologies.com/data-connector:aud: !Ref Audience
Policies:
- PolicyName: sqs-write
PolicyDocument:
Version: 2012-10-17
Statement:
- Effect: Allow
Action:
- sqs:SendMessage
Resource: !GetAtt DataConnectorQueue.Arn
Outputs:
DataConnectorURL:
Description: Queue URL to provide when setting up the Data Connector in Studio.
Value: !Ref DataConnectorQueue
DataConnectorRoleARN:
Description: Role ARN to provide when setting up the Data Connector in Studio.
Value: !GetAtt DataConnectorRole.Arn
DataConnectorAudience:
Description: Audience to provide when setting up the Data Connector in Studio.
Value: !Ref Audience
```
{% endcode %}
To deploy, create a stack from this template in the CloudFormation console. Provide the `OrgID`, `Audience`, and `QueueName` parameters, and acknowledge that the stack creates named IAM resources. When the stack has been provisioned, the **Outputs** tab lists the Queue URL, Role ARN, and Audience. Note these down and continue to Creating the Data Connector in DT Studio.
If you encrypt the queue at rest with a customer-managed KMS key, add `kms:GenerateDataKey` for the key's ARN to the `sqs-write` policy. See Encryption at Rest with KMS for more information.
### Manual Setup in the AWS Console
There are three steps: register the identity provider, create the role that trusts it, and attach the send-only policy.
#### Creating an Identity Provider
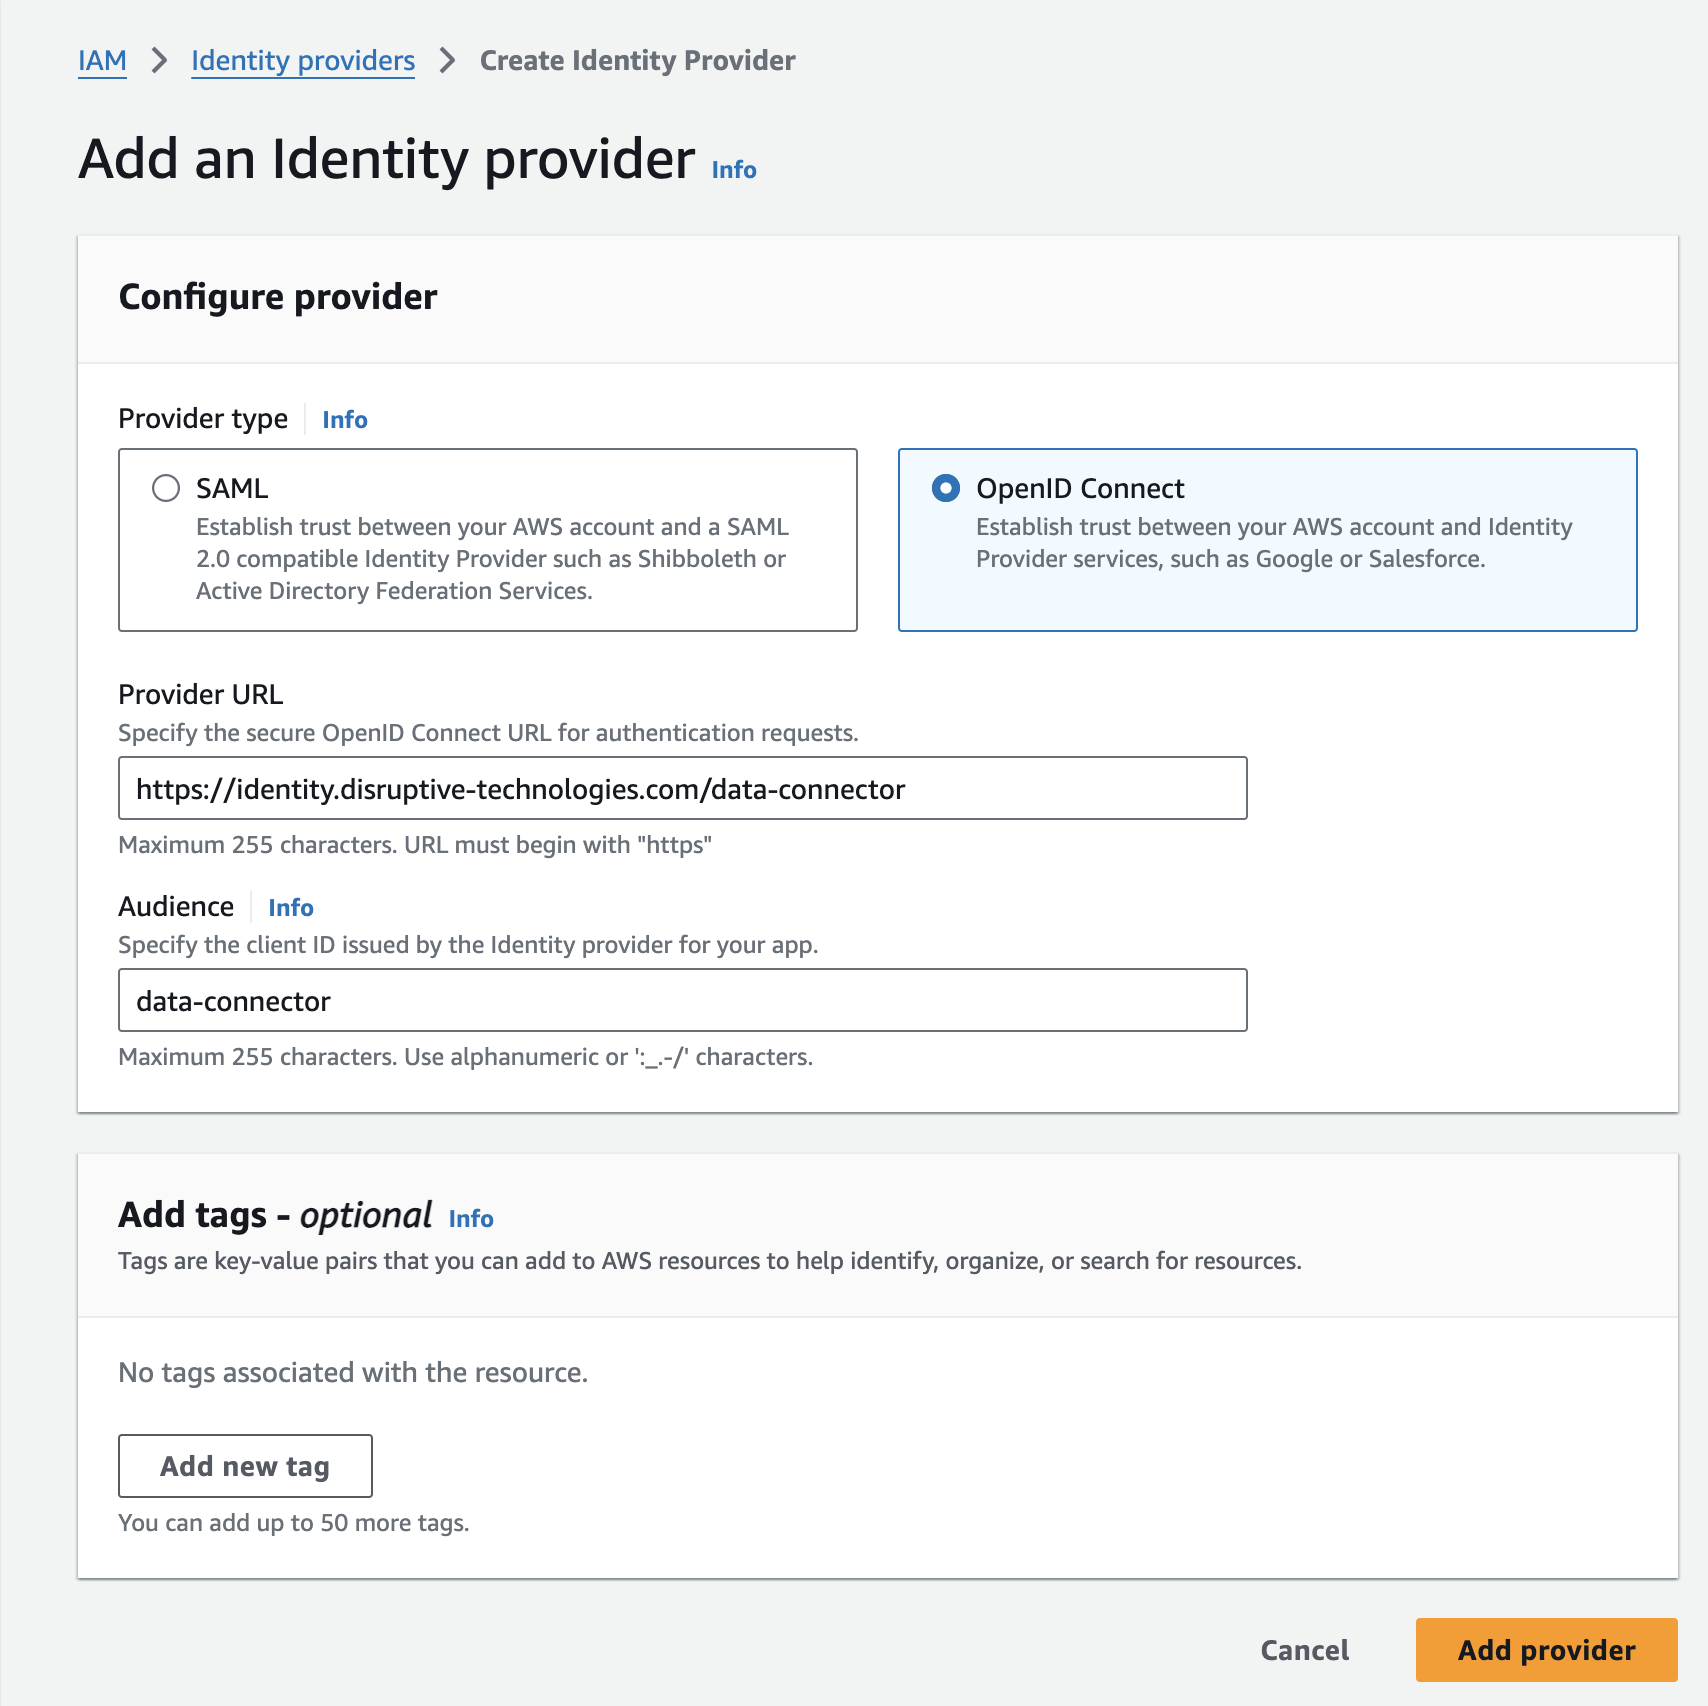
Navigate to IAM in the AWS console and select **Identity providers**, then **Add provider**. Choose **OpenID Connect** as the provider type and enter the following.
* **Provider URL:** `https://identity.disruptive-technologies.com/data-connector`
* **Audience:** the audience from your collected values, for example `data-connector`
Select **Add provider**.
#### Creating and Binding the Role
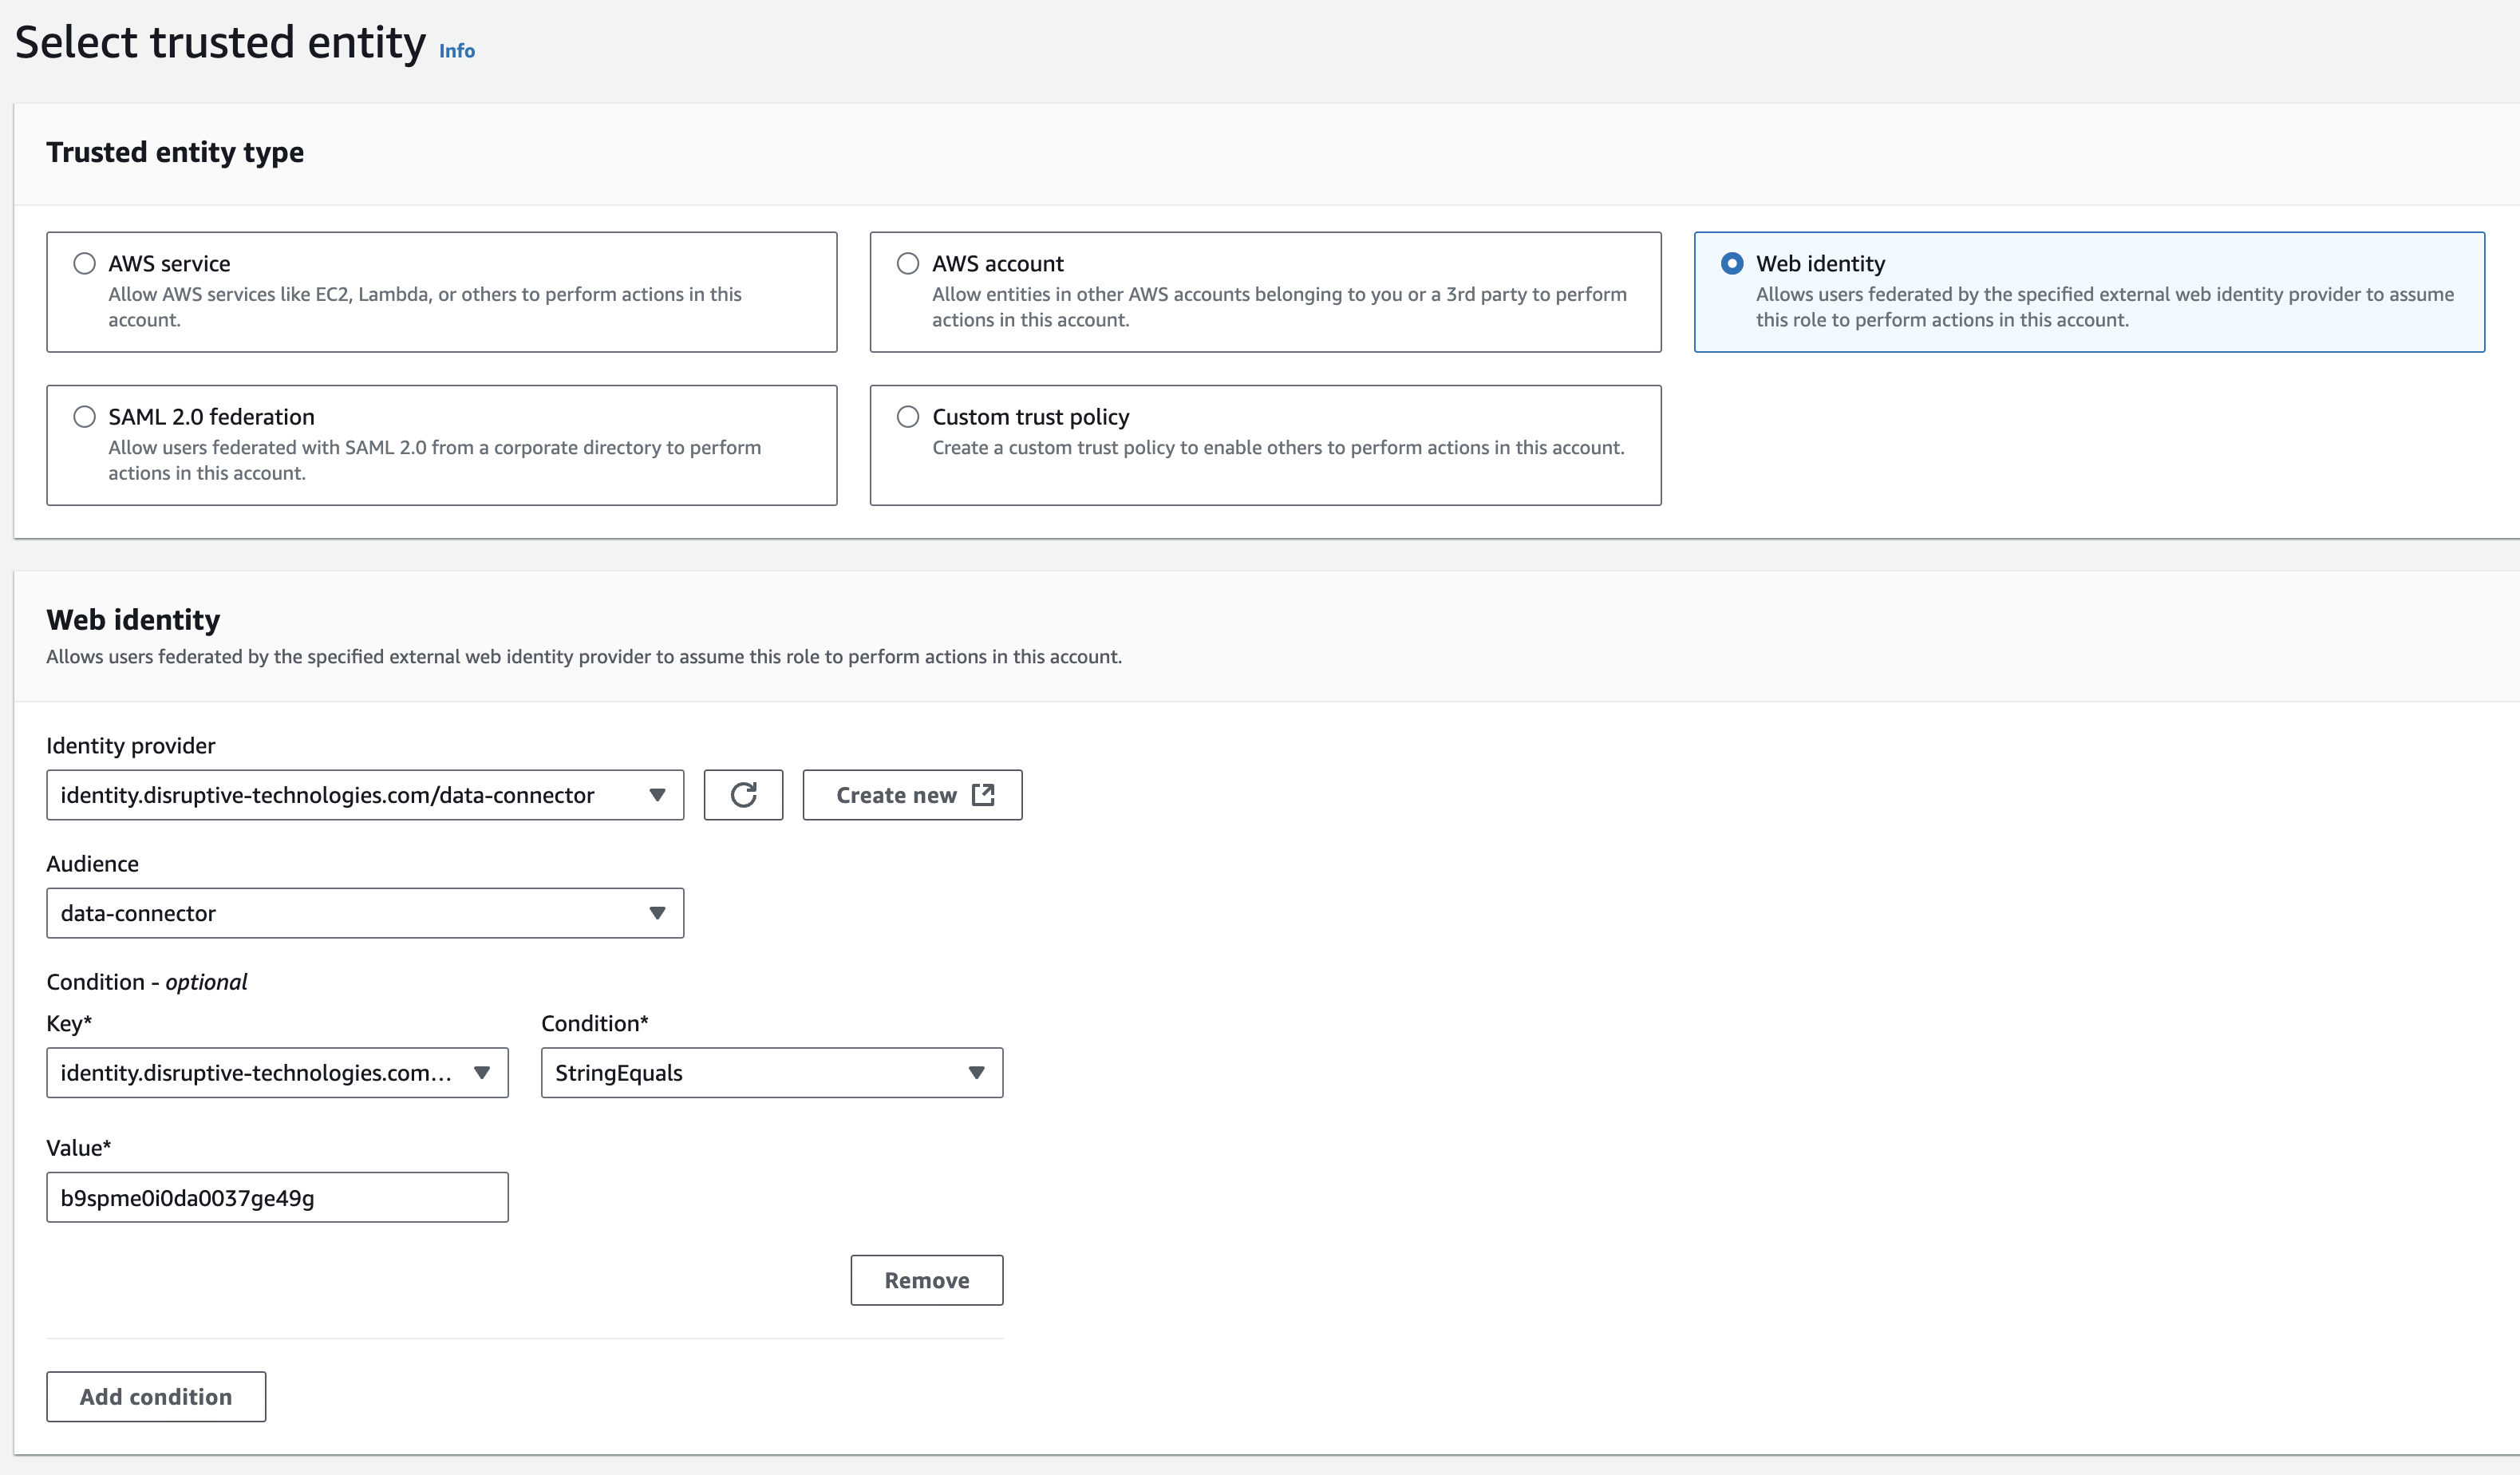
Select **Roles** in the IAM console, then **Create role**. Choose **Web identity** as the trusted entity type, and select the identity provider and audience you created in the previous step.
Next, add a condition on the subject claim so that only your organization can assume the role. Select the subject field for your provider, `identity.disruptive-technologies.com/data-connector:sub`, choose **StringEquals**, and enter your DT Studio Organization ID as the value.
Continue to the next page. Do not attach any permissions here. We add a tightly scoped policy after the role is created so that permissions can be locked down as far as possible. Give the role a name and description, add tags if needed, and create the role.
#### Attaching the Send-Only Policy
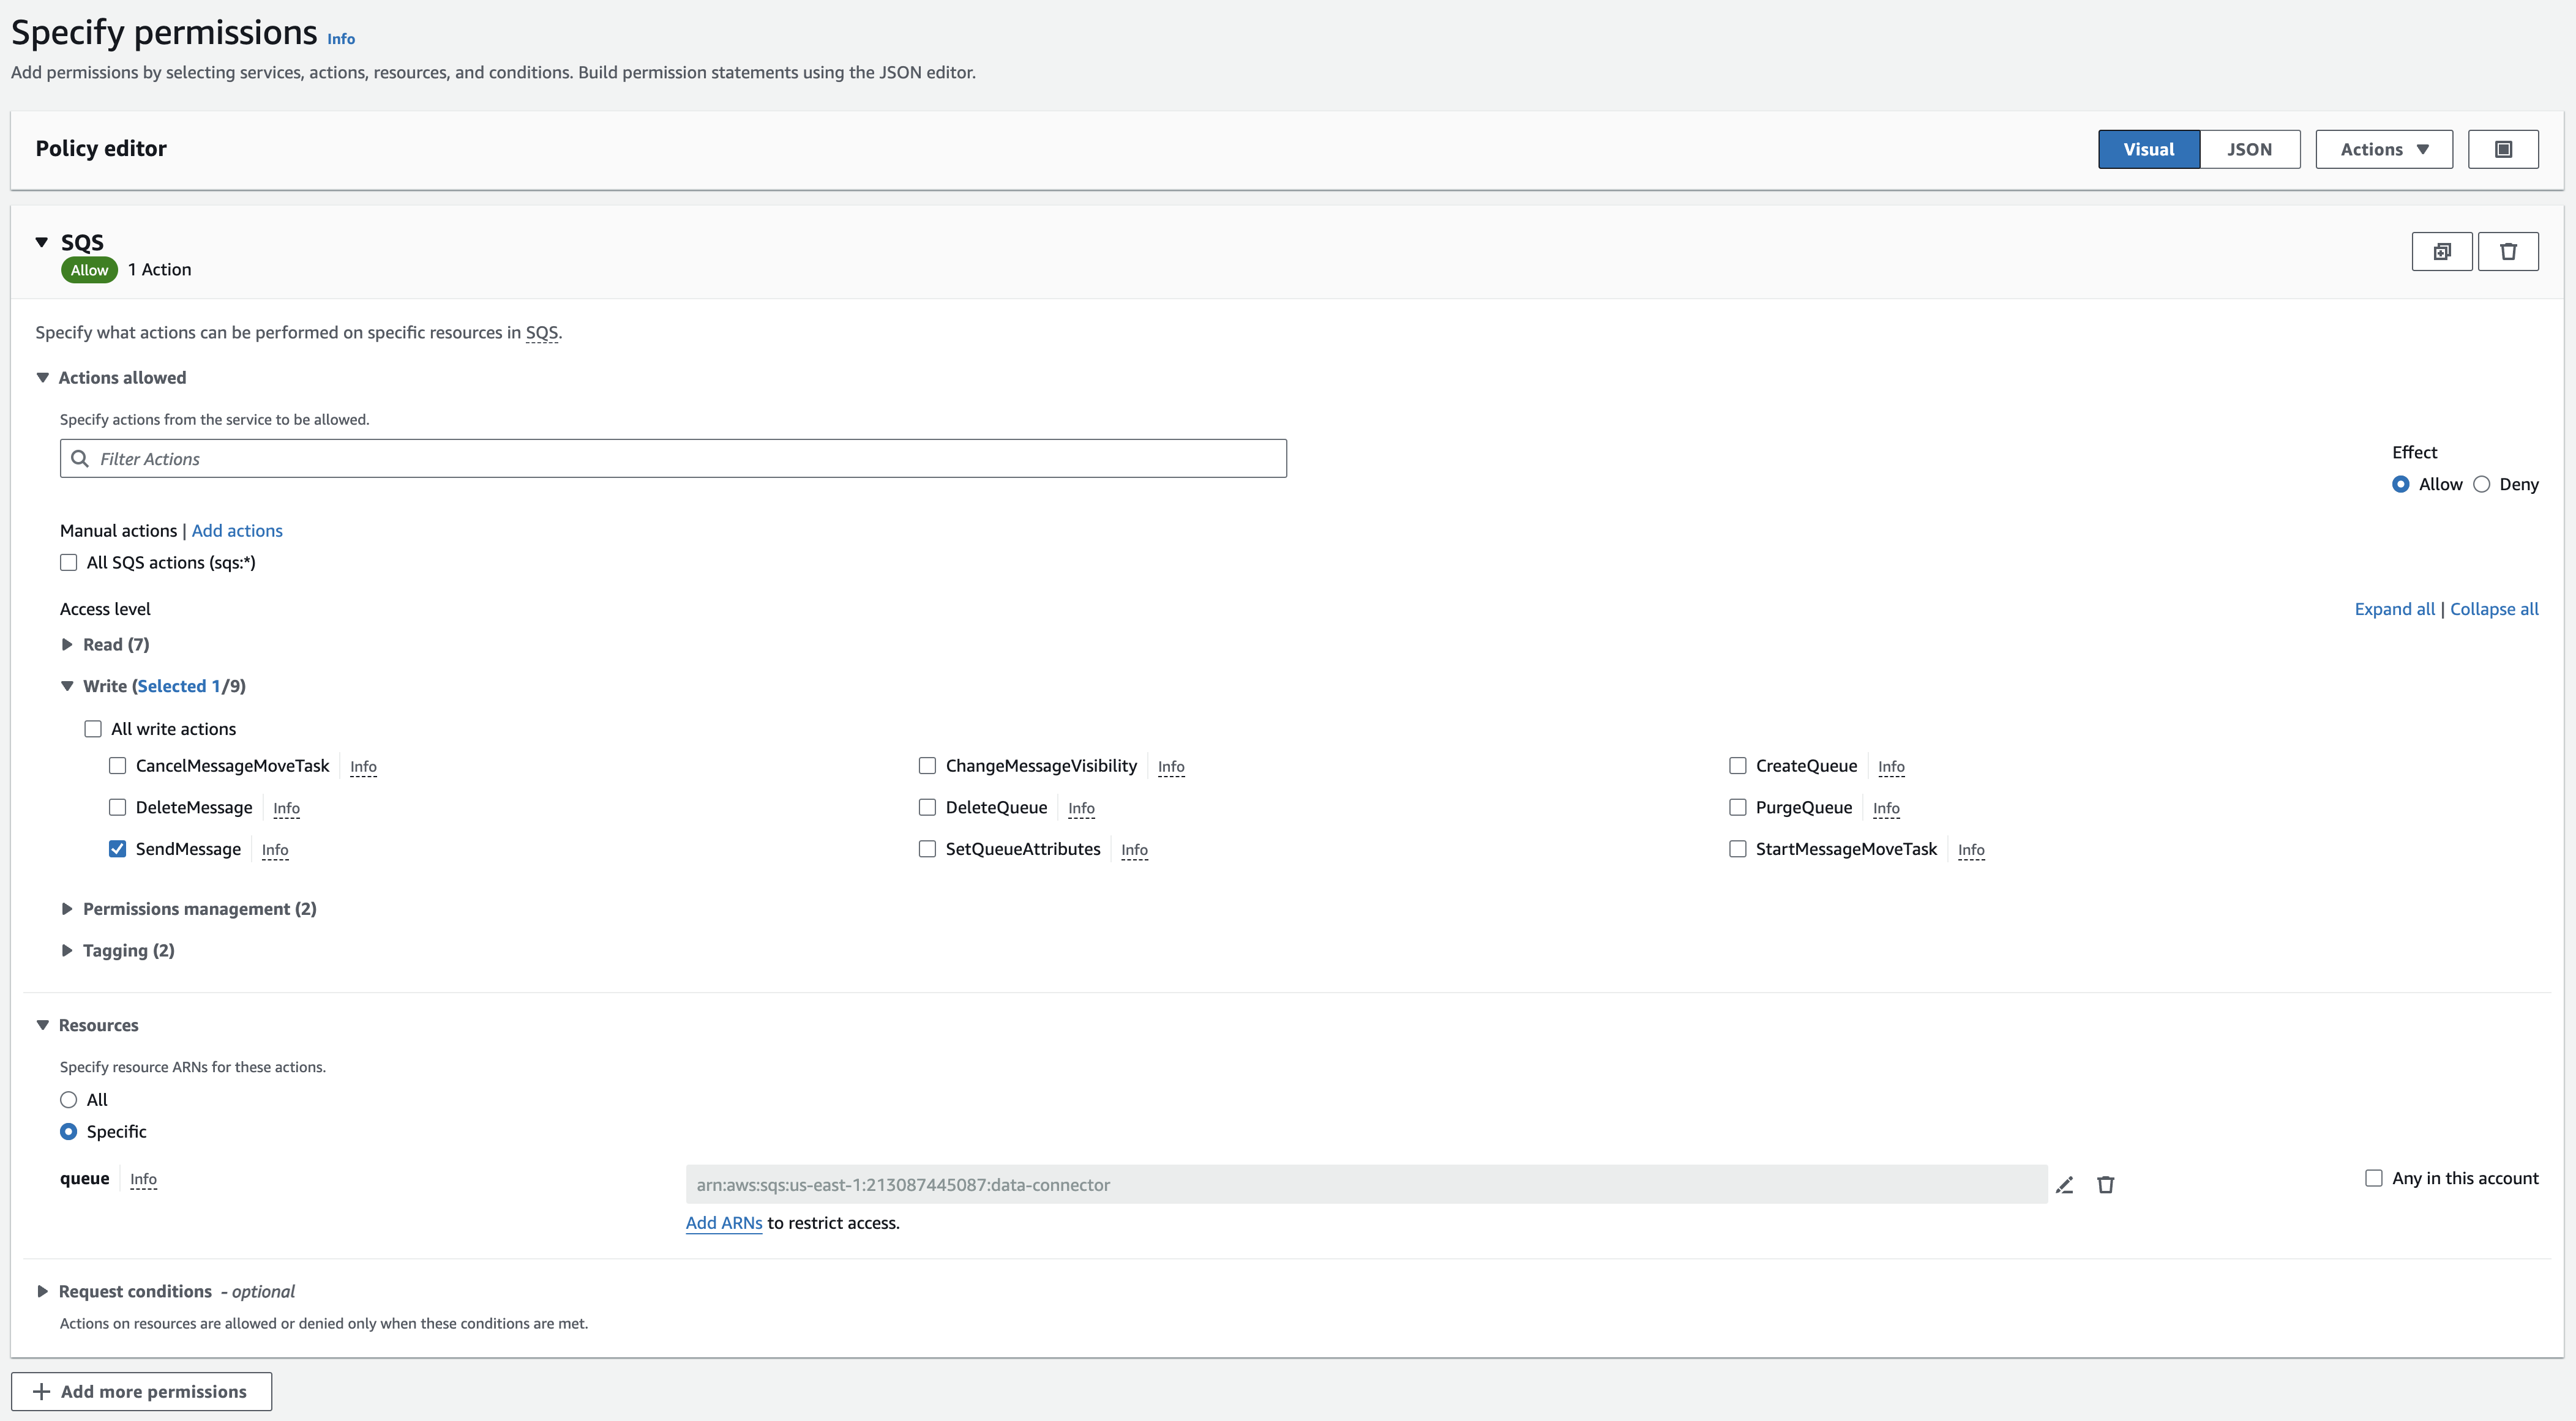
Open your new role. Select **Add permissions**, then **Create inline policy**. Choose the **SQS** service and, under **Write**, select **SendMessage**. Under **Resources**, keep the setting on specific and enter the ARN of the queue that events will be sent to. You can find the ARN in the SQS console for your queue.
Give the policy a name, for example `data-connector-sqs-write-policy`, and create it. Note down the Role ARN for use in DT Studio.
The role can now send events to your queue and perform no other action.
#### Encryption at Rest with KMS
This step applies only if your queue is encrypted at rest with a customer-managed KMS key. Because the assumed role is the entity sending messages, the role also needs permission to use the key. Add `Allow kms:GenerateDataKey` for the key's ARN to the same inline policy.
The key must be a **Symmetric** key with key usage **Encrypt and decrypt**. For guidance on creating one, see [Getting Started with AWS KMS](https://aws.amazon.com/kms/getting-started/).
### Creating the Data Connector in DT Studio
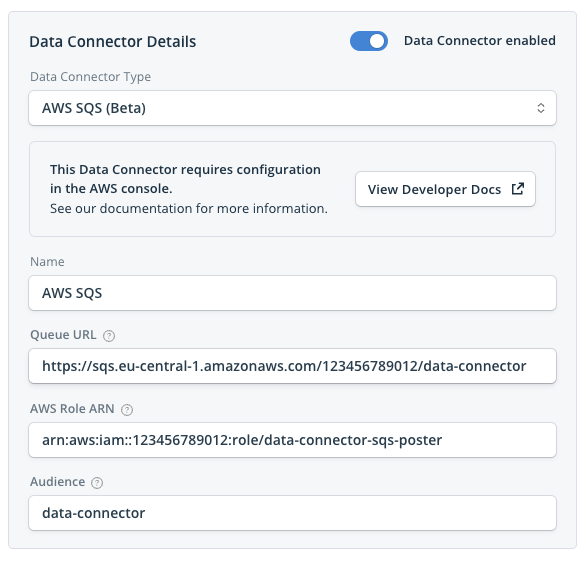
In [DT Studio](https://studio.disruptive-technologies.com/), navigate to the project you want to set up a Data Connector in. In the left menu, locate **Data Connectors** under **API Integrations** and select **Add Data Connector**. Select **AWS SQS** as the Data Connector type.
Enter the following parameters from your collected values.
* **Name:** an identifiable display name for the Data Connector.
* **Queue URL:** the URL of the SQS queue.
* **AWS Role ARN:** the ARN of the role to be assumed, on the form `arn:aws:iam::[ACCOUNT_NUMBER]:role/[ROLE_NAME]`.
* **Audience:** the audience you specified on the identity provider.
The Queue URL must be on the form `https://sqs.[REGION].amazonaws.com/[ACCOUNT_NUMBER]/[QUEUE_NAME]`. Any URL that does not match this pattern will be rejected. For example, `https://sqs.eu-west-1.amazonaws.com/123456789012/my-events-queue` is valid, whereas the queue ARN `arn:aws:sqs:eu-west-1:123456789012:my-events-queue` is not.
Save the Data Connector.
### Testing Your Data Connector
The simplest way to test the connection is to forward an event in one of the following ways.
* Wait for a sensor in the project to emit an event through its [periodic heartbeat](https://docs.developer.disruptive-technologies.com/concepts/events#periodic-heartbeat).
* Touch a sensor to force an emitted event.
* Use the [Device Emulator](https://disruptive.gitbook.io/docs/sensor-emulator) to publish an emulated event.
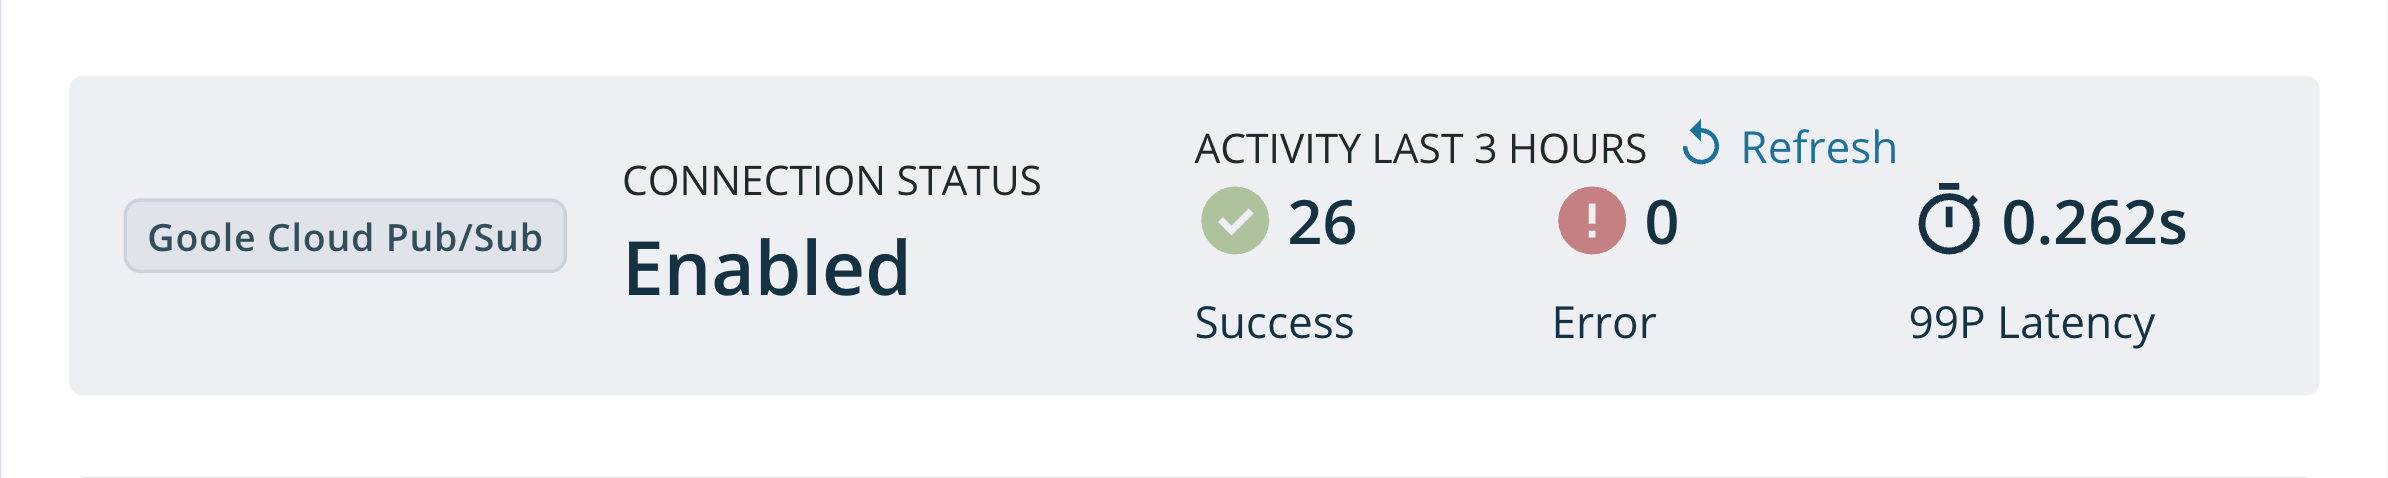
Once an event has been forwarded, it will be visible as an individual message in SQS. You can verify that an event was forwarded successfully by looking at the Data Connector metrics at the top of the Data Connector page in DT Studio.
If the error counter is incrementing, DT Cloud is unable to forward events to your queue. The table below lists the common causes. Note that these failures do not produce an error message, only the incrementing counter, so it is worth checking each one.
| Cause | What to check |
| ------------------------------ | --------------------------------------------------------------------------------------------------------- |
| Audience mismatch | The audience on the identity provider and the Audience field in DT Studio must be identical. |
| Wrong subject | The subject condition on the role must equal your Organization ID, not a project ID or account number. |
| STS not enabled in `eu-west-1` | Confirm that STS is enabled for `eu-west-1` in your IAM account settings. |
| Wrong Queue URL | The URL must match the `https://sqs.[REGION]...` pattern, and must not be the queue ARN. |
| Missing send permission | The role must allow `sqs:SendMessage` on the correct queue ARN. |
| KMS key blocks writes | For queues with a customer-managed key, the role must also allow `kms:GenerateDataKey` for the key's ARN. |
### Frequently Asked Questions
**Do I need a static AWS access key?**
No. The Data Connector uses OIDC federation to assume a role and receive temporary credentials, so there is no long-lived key to store or rotate.
**Can more than one DT organization write to the same queue?**
Each role trust is scoped to a single Organization ID through the subject condition. To allow another organization, configure an additional audience and role.
**Can one Data Connector serve multiple projects?**
A Data Connector is configured per project. Set one up in each project that should forward events. They can all target the same queue.
**Should I use a standard or FIFO queue?**
Either. The Data Connector has no requirements on the queue type.
**Why is the STS region `eu-west-1`?**
DT Cloud calls STS in `eu-west-1`. This does not restrict where your queue is located, which can be in any region.